Showing posts with label recipe. Show all posts

Friday, May 22, 2009

Recipe: Raw Apple Bread

Yield: 1 loaf
Time: 20 minutes prep; 50-60 minutes at 350F
Source: Beard on Bread, Ballantine paperback edition, 1981, pg. 153

Ingredients:
  • 1/2 c. butter or margarine (1 stick)
  • 1 c. of granulated sugar
  • 2 eggs
  • 2 c. of flour
  • 1/2 tsp. of baking soda
  • 1/2 tsp. of salt
  • 1 tsp. of baking powder
  • 1 tsp. of vanilla extract
  • 2 Tbs. of buttermilk, or soured milk
  • 1 c. coarsly chopped unpeeled apples
  • 1/2 c. of chopped walnuts
Method:
  1. cream the butter
  2. mix in the sugar, a little at a time, creaming it into the butter thoroughly between additions
  3. beat in the eggs, milk, and vanilla
  4. sift together the dry ingredients
  5. mix them into the wet ingredients, a little at a time
  6. stir in the chopped apple and walnuts
  7. spoon it into a greased loaf tin
  8. bake at 350F for 50-60 minutes
Notes:
  1. this makes a pretty sticky batter
  2. I used approx. 2 cups of chopped apple, and 3/4 c. of chopped walnuts; everything else I measured pretty accurately, as per the recipe
  3. according to James Beard, this tastes better left to sit for a day (it tastes pretty good still slightly warm from the oven, though, IMHO)
  4. it supposedly stores really well

Friday, May 01, 2009

Recipe: Banana Bread

This is a slightly adapted recipe from James Beard's paperback version of his Beard on Bread book, from 1973. He has two banana bread recipes, but the one I sort of followed is from page 147, that uses two bananas instead of three (page 146). I've tried both of them, but like this one better. It's not so heavy, and sticky-gooey, but is still full of banana-y goodness. It also makes a really nice base for a dessert, or toast for breakfast.

If you prefer your banana bread sticky-gooey, go with three bananas, skip the soured milk, and use half sugar/half honey.

We monkeys lurves our bananas!

Yield: one loaf
Time: 15-20 minutes prep; 60 minutes at 350F

Ingredients:
  • 2 c. all-purpose flour, sifted
  • 1 tsp. baking soda
  • 1/2 tsp. salt
  • 1/2 c. of butter (1 stick, or 1/4 lb.), softened
  • 1 c. sugar
  • 2 medium sized very ripe bananas, well mashed
  • 1/3 c. of milk
  • 1 Tbs. of lemon juice or vinegar
  • 1/2 c. of chopped walnuts
Method:
  1. cream the sugar into the softened butter, little by little, until well mixed
  2. plop the flour, baking soda, and salt into a bowl, and fluff it up with a fork, whisk, or whatever, to make sure it's well mixed
  3. add the lemon juice or vinegar to the milk, and let it curdle
  4. mix your eggs and curdled milk into the butter/sugar mixture, and whisk it all together until well incorporated
  5. mix some of the dry ingredients into the wet ones, about 1/3 to 1/2 cup at a time, stirring well, between additions, until you have a nice batter
  6. stir in the chopped walnuts
  7. pour the batter into a buttered/greased loaf tin, and bake at 350F for about an hour
Notes:
  1. I see no reason not to use buttermilk, if you have it, because all the dose of acid to the regular milk does is curdle it, effectively making it into buttermilk, anyway. All you really need is the acid to interact with the baking soda to make it rise. That's the ChemE major in me talking.
  2. There's no reason to get out an electric mixer for this batter -- a spoon or fork does the job just fine, or a whisk, if you prefer.
  3. Feel free to mix this batter all you want. It's not like a muffin batter that will form wormholes if you overmix it, but I see no reason to overdo it, either.
  4. If you're pressed for time, it's fine to melt the butter on the stovetop or in a microwave, rather than letting it sit out on the counter.
  5. I used approx. 2/3 c. of chopped walnuts this time, but up to 1 c. still works, and rises properly.

Wednesday, April 29, 2009

Recipe: Ham & Cheese Quiche

Yield: one pie
Time: 30 minutes prep; 45 minutes baked at 350F

Ingredients:
  • 1/2 stick (1/4 c.) of butter
  • 3/4 c. of flour
  • pinch of salt
  • one large or two small onions, sliced thinly
  • 1 c. of diced ham
  • 1/2 - 2/3 c. of Swiss cheese, shredded
  • 4 large eggs
  • salt
  • pepper
  • water (for crust), plus approx. 1 Tbs. of water, milk, or cream per egg, for the filling
Method:
  1. cut the butter (you may substitute lard or shortening) into the flour, with a pinch of salt, until the butter is about the size of small peas
  2. add cold water, 1 Tbs. at a time, mixing it in, until the dough comes together but isn't too sticky
  3. form the dough into a disk, wrap with plastic, and refrigerate for 20 minutes
  4. while the dough is in the fridge, slice and sautee the onions on medium-low heat until they cook down and start to carmelize (about 10 minutes)
  5. set aside the onions to cool while you make the egg mixture
  6. beat the eggs with the water, milk, or cream until frothy, then stir in the ham and half the shredded cheese
  7. roll out the pie crust, pop it into a pie pan, and pinch up a bit of a rim
  8. spread the onions in the bottom of the crust, then pour the egg mixture on top
  9. sprinkle the rest of the cheese on top of the filling
  10. bake for 45 minutes at 350F, until it starts to brown, and smells done
Notes:
  1. I happened to use Swiss because it's what was already open, but cheddar works really well, too.
  2. The beauty of quiche is that the filling can contain pretty much anything you want -- broccoli & cheese, mushrooms, crabmeat, etc.

Friday, April 17, 2009

Recipe: Apple Crisp

This is one of those idiot-proof recipes that is fine by itself, warm from the oven, with or without a dollop of vanilla ice cream on top, or even cold the next morning for breakfast.

Yield: one bread loaf tin, or an 8" x 8" baking dish (4 to 6 servings)
Time: 75 minutes (30 minutes prep, and 45 for baking at 350F)

Ingredients:
  • 4-6 apples (depending on size), peeled cored, and sliced/diced, not too thinly
  • approx. 1/3 c. of white sugar
  • approx. 2 tsp. of cinnamon
  • approx. 1/2 tsp. of nutmeg
  • approx. 1/3 tsp. of cloves
  • approx. 1/2 tsp. of allspice
  • 1/3 stick of butter, melted
  • 1/3 c. of brown sugar
  • 1/2 to 2/3 of a cup of rolled oats (quick cooking, or regular doesn't matter)
Method:
  1. peel, core, and slice the apples into a mixing bowl
  2. mix the white sugar and spices, then toss them over the apples, a little at a time, tossing the apples around to get them fully coated
  3. Let the apples sit to juice for 10-15 minutes
  4. brush the loaf tin or baking dish with melted butter, then plop in the apples, and spread them out fairly evenly
  5. Mix the remaining melted butter with the brown sugar and oats thoroughly (I use the same bowl the apples were juicing in, so that I don't miss any of the spices)
  6. Dump the topping mixture over the apples, and spread it out fairly evenly
  7. Bake at 350F for 45 minutes, give or take a few -- it's done when it smells done, the apples and sugar get bubbly, and the topping isn't too browned
Notes:
  1. I've tried this with Granny Smiths, but prefer Yellow Delicious apples
  2. I don't find the need to use flour in the sugar mix for either the apples, or the topping, but if your apples are especially juicy, about 1 Tbs. should be enough, in each of the sugar mixtures, before they go on the apples
  3. This reheats really well in a microwave

Tuesday, April 14, 2009

Recipe: Split Pea Soup

Yield: half a gallon
Time: a couple of hours

Ingredients:
  • one ham bone, with some of the meat still on it, plus some previously picked off bits of meat that isn't viable for sandwiches
  • two small to medium sized onions, quartered and sliced
  • one large or two smaller carrots, peeled and diced, or sliced
  • one pound of dried split peas
  • approx. half a teaspoon of salt
  • pepper, preferably freshly ground
  • two quarts of water
Method:
  1. sautee the onions a few minutes until translucent
  2. add the ham, ham bone, split peas, water, salt and pepper
  3. bring to a boil then turn the heat down to low and simmer until the peas start to fall apart on their own (I let it go for a couple of hours, but it probably doesn't really take that long)
  4. pull out the ham bone and let it cool
  5. pick some more meat off the bone, shred it, and toss it back into the pot
  6. whoosh it through a blender, or use a "boat motor" type hand held stick blender, until it's fairly smooth, but you can still see flecks of pork
  7. adjust seasonings if necessary
Note: I normally use carrots in this recipe, but didn't have any this time, and I really don't think the soup suffered for the lack of them.

Saturday, March 07, 2009

Recipe: Easy Potatoes au Gratin

I've seen variations on this dish, some of which don't even use cheese, but that's no fun, is it? My version here is really simple: peeled and sliced potatoes, a basic bechamel to which I add several big handfuls of grated cheese, and a breadcrumb topping.

Yield: 4 servings
Time: 20 minutes prep; 1 hour at 375F

Ingredients:
  • 4-5 small potatoes, washed, peeled, and sliced thinly
  • 1 Tbs. of oil, butter, or bacon grease
  • 1 rounded Tbs. of flour
  • approx. 1 cup of milk (or cream)
  • salt
  • pepper
  • approx 1.5 cups of grated cheese (swiss, emmenthaler, monterey jack, and/or fontina are good choices)
  • a handful of plain bread crumbs (you could use panko, but regular breadcrumbs work fine)
Method:
  1. peel, slice and arrange the potatoes in a baking dish
  2. make a light roux: heat your fat of choice, add the flour to it, and whisk together
  3. cook that for a couple of minutes to get rid of the floury taste
  4. add your milk or cream, little by little, as it thickens, whisking the whole time
  5. add salt and ground pepper
  6. when the sauce coats the back of a spoon, but isn't too thick, add the cheese, a handful at a time, stirring or whisking it in (the cheese will further thicken the sauce, so you don't want it too thick to begin with)
  7. pour this over the potatoes, and stir it all together to get them well coated with sauce
  8. sprinkle on the breadcrumbs, and bake at 375F for about an hour
Notes:
  1. I cover the baking dish for all but the last 15 minutes.
  2. You could use a mix of breadcrumbs and grated parmesan or romano for the topping.
  3. The cheese you use is up to you, but should have a sufficiently low melting point to incorporate into the bechamel. I find cheddar is rather oily, and I wouldn't use something like mozzarella that might get gummy.
  4. The finished product really wasn't that yellowy; it seems to be a function of taking the photo indoors after dark.

Friday, March 06, 2009

Recipe: Beef Stew

Like most stews and burgoos, there are lots of variations. I normally add carrots and mushrooms, but we were out of them, so I made do with onion, celery, garlic, and potato. The meat we had in the freezer was a chunk of London Broil. The picture to the left shows it after I added the beef broth and meat back to the pot. As you can see, it's hot enough to be steamy.

Yield: 4 servings
Time: 2-3 hours on the stovetop

Ingredients:
  • 8 oz. chunk of beef (doesn't have to be cubed ahead of time)
  • Flour, salt, and pepper to dredge the meat
  • 2-3 Tbs. of olive oil
  • 1 14.5 oz. can of beef stock
  • One large, or two small onions, diced
  • 2 large stalks of celery, diced
  • a few cloves of garlic, minced
  • one or two bay leaves (optional, but I really love the flavor)
  • carrots (optional)
  • mushrooms (optional)
  • one or two potatoes, depending on size, peeled and cut into 1/2" to 3/4" cubes.
  • extra salt and freshly ground pepper
  • 1 Tbs. cornstarch, with enough water to make a slurry
Method:
  1. Dredge the beef in the seasoned flour, and sear it on all sides in the olive oil
  2. Remove the beef and set it aside while you sweat the veggies, except for the potatoes, (about 8 minutes) on medium-low
  3. When the veggies are translucent, add the beef stock to the pot to deglaze it, add the beef back to the pot, nestling it down in the liquid, and add the bay leaf
  4. Put a lid on it, and let it simmer on low, until the meat is tender enough to shred (2-3 hours, depending on how tough your cut of meat is), flipping the meat every half hour or so
  5. Remove the meat, let it cool for a few minutes, then shred it
  6. Add the shredded beef and cubed potatoes back to the pot, and give it another half hour
  7. Add the cornstarch slurry to the liquid and let it come to a boil to thicken
  8. Adjust the seasonings to taste, and serve
Notes:
  1. You could make a medium-dark roux to use for thickening the sauce, after sweating the veggies, but I find the veggies will get coated in the oil and don't leave any in the bottom of the pot, so you'd have to add more oil, if you want to go this route. The cornstarch isn't exactly low-carb, but at least it doesn't add the sort of calories to the dish that adding another couple of tablespoons of oil and flour to make a roux does.
  2. You can substitute bouillon cubes and water for the beef broth, but if you do, go easy on the salt.
  3. I prefer Baleine sel de mer fin, but Kosher salt, or even ordinary table salt will do.

Wednesday, March 04, 2009

Recipe: Chili

I never make this stuff with a recipe. Every time I make it, it comes out different. This batch was slightly soupier than I prefer it, but was hot enough to blow a hole through an oriface.

There are a bazillion recipes for chili. Here's mine --not that I ever follow it, but, whatever.

Serves: 4
Ingredients:
  • 1 lb. of ground beef, or buffalo, skillet-browned
  • 3 large stalks of celery, chopped
  • 2 large onions, chopped
  • 1 qt. of beef stock
  • 2 14.5 oz. cans of diced tomatoes, with peppers, etc.
  • beans (pinto, black, kidney, or some mix, if you like)
  • oregano
  • half a head of garlic, mashed
  • cumin
  • chili powder
  • salt
  • freshly ground black pepper (I prefer Tellicherry)
  • red pepper flakes
  • corn (frozen is alright, but fresh is better)
Method:

  1. Brown the ground meat, and remove it from the heat
  2. Sautee the veggies, along with the spices
  3. Dump the beef broth into the pan to deglaze it, stir well, then toss the rest of the ingedients back in, including the previously browned ground meat
  4. Simmer on really low heat for another 3 hours
  5. Adjust seasonings to taste, then serve
Notes:
  1. Some people love sour cream with chili. I hate sour cream, so I go with grated cheddar.
  2. Chopped scallions are optional, for garnish. I don't bother with them unless I have guests.
  3. Chili always tastes better the next day, even if it tastes fantastic 15 minutes after it's done.
  4. I prefer the canned diced tomatoes that already have other stuff in it, but plain diced tomatoes are alright. You can even use stewed tomatoes, if that's what you have on hand. In the summer we stew and "can" our own tomatoes in 1 qt. mason jars.

Monday, March 02, 2009

Recipe: Baked Ziti

As far as I know, this is the sort of dish people just make without referring to a recipe. I suspect there are variations on it, just as there are with chili or stews. The hard way, of course, is to make the tomato/spaghetti sauce from scratch.

That's great in summer when you can either pick vine-ripened romas from your garden, or buy them from a local farmer or at a grocery store. This time of year, however, grocery store tomatoes are pretty tasteless, so I use a commercial jarred spaghetti sauce.

Yield: 2-3 servings
Time: 15 minutes prep; 45-60 minutes at 350F

Ingredients:
  • 1 cup of dry ziti, or a little more if you use fresh
  • 1/2 to 2/3 cup of spaghetti sauce
  • 3/4 to 1 cup of shredded mozzarella
Method:
  1. Cook the pasta according to directions
  2. Meanwhile, shred the cheese, and spread out a layer of sauce in the bottom of the baking dish. Cover it with a layer of the shredded cheese.
  3. Drain the pasta, and arrange a layer of it in the dish on top of the cheese
  4. Add another layer of sauce, and another layer of cheese
  5. Top with more pasta, and layer on more sauce, and a final layer of cheese
  6. Cover the baking dish with foil if it doesn't have its own cover
  7. Bake for about 45-60 minutes at 350F, until it smells done, and is all bubbly
  8. Let cool for a few minutes before serving
Notes:
  1. I prefer to remove the foil or lid for the last 15 minutes to allow the cheese to brown a little bit.
  2. You may want to place your baking dish in a drip tray or on a cookie sheet if it's really full. I have had the tomato sauce bubble over the sides a time or two, and my oven is not "self-cleaning."
  3. The baking dish I used here is only 6" diameter, across the inside rim, to give you an idea of scale. However, this recipe scales up very nicely to a regular sized casserole dish.
  4. I have, in a pinch, made this with rigatoni, a large sized macaroni, or even fusili (broken into 2" lengths). Most likely, anything tubular would do fine, if you run out of ziti, as long as it's not big enough to stuff, like manicotti.

Sunday, March 01, 2009

Recipe: Pumpkin-Spice Bars

Yield: One 15.5" x 10.5" jelly roll panful (approx. 48 - 54 bars)
Time: 25-30 minutes at 350F

Ingredients:
  • 4 eggs
  • 2 cups of sugar
  • 1 cup of vegetable oil
  • 1 can of pumpkin
  • 2 cups of all-purpose flour
  • 2 tsp. baking powder
  • 2 tsp. ground cinnamon
  • 1 tsp. baking soda
  • 1/2 tsp. salt
  • 1/2 tsp. ground ginger
  • 1/4 tsp. ground cloves
  • 1 cup of raisins
  • cream cheese frosting
  • 1/2 cup of chopped walnuts
Method:
  1. beat eggs, sugar, oil and pumpkin in a large bowl until smooth
  2. stir in flour, baking powder, baking soda, salt, and spices
  3. stir in the raisins
  4. pour into a greased jelly roll pan
  5. bake at 350F for 25-30 minutes
  6. Let the pan cool on a rack, while you make the frosting
  7. frost the cake, and sprinkle on the chopped walnuts
Cream Cheese Frosting
  • 3 oz. of cream cheese, softened
  • 1/3 cup of butter, softened (approx. 2/3 of a stick)
  • 1 tsp. vanilla extract
  • 2 cups of powdered sugar
  1. cream together the cream cheese and butter
  2. mix in the vanilla
  3. stir in the powdered sugar little by little, until well incorporated and smooth
Notes: This comes out very much like carrot cake. You may want to add a little more of the spices than the recipe calls for; I found the spice a little on the subtle side, despite the fact that my jars of it were pretty new.

Tuesday, February 24, 2009

Recipe: Tuna Casserole

Yield: 4 servings
Time: 30 minutes prep; 45 in the oven at 350F

Ingredients:
  • one medium sized onion, diced
  • 2-3 stalks of celery, diced
  • handful of white or brown mushrooms, chopped (optional)
  • one clove of garlic, sliced thinly or minced (optional)
  • 2 6-oz. cans of tuna, thoroughly drained, and flaked
  • dried spaghetti or linguini (about 3/4" diameter held between your thumb and index finger, if you circle them together), broken in half or thirds
  • 3-4 Tbs. of olive oil
  • 2 Tbs. of flour
  • 1 to 1-1/4 cups of milk (you could use light cream)
  • salt
  • pepper (preferably freshly ground)
  • handful of grated parmesan
  • handful of Italian-style breadcrumbs
Method:
  1. Sautee the onions, celery, and mushrooms in enough olive oil to get the job done, making them sweat, not fry, on medium to medium-low heat. This should take no more than 10 minutes. Set them aside to cool.
  2. Add 2 Tbs. of olive oil and 2 Tbs. of flour to the pot in which the veggies sauteed, and stir or whisk well to make a roux. Cook it just long enough to get the flour taste out of it. You're shooting for a really light roux here, so it shouldn't take more than a minute or two.
  3. Add some milk, maybe 1/3 of a cup to start with, and whisk it in really well. When it starts to thicken, add more milk, a splash or two at a time, and whisk it in really well. Repeat as necessary until you have a sauce that's not runny, but somewhat on the thin side. It should coat a spoon, but drip off pretty quickly. Add salt and pepper to taste. Collectively, this step with the previous one, is sort of a fake bechamel. Cover the pot, so your sauce doesn't form a skin, unless you do step 4 simultaneously with this one.
  4. Boil the pasta, according to directions. You can let it go a minute or two beyond al dente, but don't let it get mushy. Frankly, you can do this simultaneously with step 3.
  5. Drain the pasta and stir it into the milk/cream sauce, mixing well.
  6. Stir in the veggies, and mix well, then stir in the flaked tuna, and mix well. It's supposed to look like glop -- it's a casserole.
  7. Pour the mess into an oven-proof casserole dish, sprinkle a handful of grated parmesan on top, then sprinkle a handful of Italian-style breadcrumbs on top of that.
  8. Bake in a 350F oven, covered, for 30-35 minutes, then remove the cover, and bake another 10-15 minutes. It's done when it smells done, the sauce bubbles through the topping in a few spots, and the topping gets golden brown.
Notes:
  1. I was out of mushrooms, so I omitted them this time. I like this dish better with the mushrooms, but it tastes fine either way.
  2. All I had around was 2% milkfat milk, so that's what I used for the sauce, but it doesn't really matter what you have around -- it'll work, as long as you shoot for the right consistency of the sauce. Even skim works.
  3. The reason for the milk/cream sauce being a little on the thin side is that while the casserole bakes, the pasta will absorb more liquid, so the sauce gets thicker by default.
  4. Leftovers reheat really well in a microwave on 40-50% power.

Saturday, February 21, 2009

Recipe: Low-Fat Chicken Stew

This is a relatively low-fat version of chicken stew that uses a cornstarch slurry at the end to thicken the liquid, rather than a roux at the beginning. The leftovers reheat really well, either on the stovetop, or in a microwave at 40% (or so) power. Truth be told, I didn't follow a recipe, or even refer to one; I just cooked it. Ingredient quantities are approximate.

Yield: approximately half a gallon
Time: 2-3 hours, on the stovetop

Ingredients:
  • One very large chicken breast on the bone, or two small ones, with the skin
  • 4 stalks of celery, sliced about 1/4" thick
  • 4 oz. of baby carrots, sliced about 1/4" thick (or two large carrots)
  • one very large onion, or 2-3 smaller ones, roughly chopped
  • cloves from half a small head of garlic, or 1/3 or a large one, peeled and sliced
  • 2 small or one large potato, peeled, and diced into 1/2" chunks
  • 1 qt. of chicken stock (chicken broth works fine, too)
  • rosemary
  • thyme
  • salt (preferably sea salt, but it doesn't really matter)
  • pepper (preferably freshly ground Tellicherry)
  • 3-4 Tbs. of olive oil
  • 1 Tbs. of cornstarch
Method:
  1. Heat 1-2 Tbs. of olive oil in a wide pot, and brown the chicken breasts on medium heat. You can coat them with flour first, but it's not necessary -- salt and pepper's sufficient.
  2. Remove the chicken, and toss in the sliced veggies, add salt and pepper, then reduce the heat to medium-low. Add more olive oil as necessary. Let the veggies sweat until the onion is translucent, stirring occasionally (about 10 minutes).
  3. Place the chicken back in the pot, bone side down, sprinkle on the thyme and rosemary, then add the chicken stock. Nestle the chicken down into the stock and veggies a bit, then put a lid on the pot. Reduce the heat to a low simmer.
  4. After about an hour, flip the chicken, and nestle it back into the rest of the stuff in the pot.
  5. Give it maybe another 20-30 minutes, then take out the chicken, and let it cool for a few minutes.
  6. Peel the skin off the chicken, throw it away, along with the bones, and shred the chicken.
  7. Toss the shredded chicken back into the pot with the diced potato. Let it simmer for another half an hour. The lid is optional at this point.
  8. Mix the cornstarch with enough cold water to make a slurry, then stir it into the pot. It'll thicken the "sauce" once it comes to a boil.
  9. Adjust the seasonings to your taste, serve, and enjoy.

Wednesday, February 04, 2009

Sourdough Loaf

This is the way it came out of the oven after 375F for around 45 minutes, and cooling. The starter we have is a good 30 years old. Personally, I'd like it less dense, but it has a good flavor, a good crumb, and makes really good toast. It also makes an excellent base for eggs benedict, if you have no english muffins on hand.

The next picture shows an inside shot, to give you an idea of the crumb, and denseness. It's sourdough, so it's not really supposed to look like a baguette, inside, but I'd prefer bigger holes in it.

As James Beard said in Beard on Bread, to paraphrase . . . sourdough is really unpredictable. Indeed, it is.

In the end, it's no denser than your average loaf of Russian rye. I keep thinking I could have cooked it another 10 minutes, but the bottom really is cooked. It's not gooey.

I'd love to post a recipe for it but, sourdough is just one of those things you make, without any exact proportions. The following paragraph gives you my best shot at it.

Take out the starter, dump in a cup of milk and a cup of flour, mix it together really well, and let it sit around all day until it gets really bubbly. Then toss half the mix back into the fridge to be starter for next time. Work the rest into a soft (but not sticky) dough, form it into a loaf, plop it into a loaf tin, cover it with plastic wrap, and let it rise until it tops the pan. Bake it at 375F until it smells done -- around 45 minutes.

Monday, January 26, 2009

Recipe: Onion Soup

If you don't happen to have any crusty French or Italian bread loaves around, you can still make onion soup.

Yield: 2 servings
Time: 45 minutes

Ingredients:
  • One really huge onion or two medium-sized ones, sliced in half rings
  • a clove or two of garlic, depending on how big they are
  • a little dry white wine
  • a pint of beef broth
  • a bay leaf
  • salt
  • pepper
  • a little olive oil
Method:
  1. Sautee the onions in the olive oil until they become translucent, then add the garlic, and sautee for another few minutes
  2. Dump in the white wine to deglaze the pot
  3. Give it a few minutes to burn off, then add the beef broth, and the bay leaf.
  4. Let it simmer for half an hour, uncovered, remove the bay leaf, and serve with a broiler-toasted crouton and mega-cheese, if you have it, or if not, use grated parmesan.
Notes:
  1. It's not the end of the world if you don't happen to have toasty bread, a boatload of cheese on hand, and crockpots that can go under the broiler
  2. It's not Kosher -- not with the beef broth and cheese. Use veggie broth and cheese, or the traditional beef broth, and skip the cheese, to make it Kosher.

Recipe: Cream of Wild Mushroom Soup

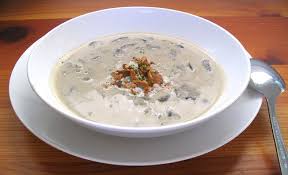
I've been on a bit of a soup kick, lately, with the well below freezing outside temperatures. For whatever reason, it never really occurs to me to take pictures of soup, because we all sort of know what it looks like. Nonetheless, here's my best attempt to replicate the delicious version of "crema di funghi zuppi" from Basilico.

Yield: 4 servings
Prep Time: 10 minutes
Cook time: 75 minutes

Ingredients:
  • olive oil
  • approx. 4 Tbs. of butter
  • one large, or two small onions
  • one large leek, white and light green parts sliced (~ 1/8" wide rings, or you could use ~ 1/4 cup of diced shallots)
  • 3/4 lb. of mixed wild mushrooms (shiitake, portobello, and porcini are good choices; personally I want the dark color for contrast with the cream base, so I leave inoke or oyster mushrooms out of this)
  • scant 1/4 cup of flour
  • 3/4 cup of dry white wine
  • 3/4 cup of milk
  • 3/4 cup of half-and-half
  • salt
  • pepper
  • 1/2 - 1 tsp. of thyme, depending on your taste
Method:
  1. Brush off the mushrooms with a damp towel, and remove the stems to use for stock
  2. Chop the stems, and mushroom caps
  3. Sautee the mushroom stems, onion, a pinch of the thyme, 3/4 tsp. of salt, and half that of freshly ground black pepper for 10 - 15 minutes, in 1 Tbs. olive oil and 1 Tbs. of butter
  4. Add 4 cups of water to the pot, bring to a boil, and simmer, uncovered for half an hour
  5. Strain the mushroom stock, and discard the solids
  6. Sautee the leeks in the remaining butter, with an additional 1 Tbs. of olive oil, on low heat, for about 10 - 15 minutes, until the leeks start to carmelize
  7. Add the chopped/diced mushroom caps and flour. Cook for another minute or so
  8. Add the white wine to deglaze the pot, scraping and stirring up the goodness (this takes about a minute or less)
  9. Add in the mushroom stock, remaining thyme, salt and pepper, and bring to a boil
  10. Reduce heat, and simmer for 15 minutes
  11. Add the milk and half-and-half, and heat through, but don't boil it
  12. Adjust salt and pepper as necessary
  13. Serve as is, if you prefer, or whoosh it with a "boat motor" mixer to turn the mushrooms into flecks rather than chunks
Notes:
  1. The wine is optional, if you're a teetotaler, or don't have any on hand, but it does add something.
  2. Basilico whooshes the soup, which I prefer, but I consider that optional.
  3. This makes a slightly-thick, creamy soup. If you prefer something thicker, richer, and more calorie-laden, just increase the flour content a little, and use light cream instead of a mix of milk and half-and-half.
  4. I don't bother garnishing it with anything, but I only serve it at home
  5. The recipe may sound more difficult than it is. It really only takes about 20 minutes worth of full attention to what's on the stovetop, during the two sautee processes, and the rest is just simmering, until the dairy goes in at the very end.
  6. If the idea of a light roux to thicken it makes you want to barf, calorie-wise, just use a slurry of cornstarch instead.

Wednesday, January 21, 2009

Onion Soup

After having a bowl of S's chili for lunch, I wanted something lighter for dinner. I didn't have any good crusty bread for a crouton, or any white wine, so this is hardly traditional, for those who have fond memories of French onion soup, with the toasted crouton, and gobs of cheese melted under the broiler. Yet, it was really tasty. After I made it, I checked Foodnetwork.com for French onion soup recipes, and was pleasantly surprised to see something similar to mine, from Ina Garten. She uses butter, sherry, cognac, and wine, but, otherwise, it's very similar.

I didn't take a picture. Truth is, it didn't occur to me to do so, but we all know what onion soup looks like, right? S is away on business, and doesn't really like onion soup very much, so this was the perfect opportunity for me to make an old favorite just for myself.

Yield: 2 servings
Cook time: 30 - 40 minutes

Ingredients:
  • One huge, or two smallish onions
  • 1 - 2 cloves of garlic, depending on size, minced
  • approx. 1 Tbs. of olive oil, maybe a little more
  • 1 pint of beef broth
  • a bay leaf
  • salt
  • freshly ground black pepper
  • grated parmesan
Method:
  1. Peel the onions, and cut them in half, then slice them fairly thinly
  2. Mince the garlic
  3. Sautee the onions with the garlic, bay leaf, and a little salt and pepper in the olive oil on medium heat until the onions get translucent and turn a little yellowy (10 - 15 minutes)
  4. pour in the beef broth, stir well to deglaze the pan, and let simmer uncovered for 20 minutes
  5. Add a little extra water, if necessary, to make up for the steam loss during simmering
  6. Remove the bay leaf
  7. Adjust the salt level to taste, if necessary
  8. Ladle the soup into a bowl, and top with grated parmesan cheese
Note: the grated parmesan will sink, and turn the soup cloudy, but it's alright, and doesn't detract from the taste at all. You could also make a Kosher version by substituting vegetable broth for the beef broth, but it's not the same. Leave off the cheese, and the Kosher version becomes vegan.

Monday, January 19, 2009

Foccacia

Yield: One 9" x 13" loaf
Time and Temp: 35 minutes at 375F

Ingredients:
  • 1-1/2 cups of warm water (110 - 115F)
  • 1 packet of yeast (1/4 oz.)
  • 1 Tbs. sugar
  • 2 tsp. salt
  • 3 - 3 1/2 cups of flour (all-purpose is fine)
  • olive oil
  • rosemary, about a teaspoon (freshly chopped is better, but dried is okay, if you crush it up a bit)
Method:
  1. Mix the first three ingredients in a small bowl, and leave it until it gets foamy
  2. Mix 3 cups of the flour and the salt in a large bowl
  3. Stir the foamy yeast mix into the dry ingredients, and mix well (it will be sticky)
  4. Turn out the dough onto a floured surface, and knead it for a few minutes, working in more flour until it's still soft, but no longer sticky, and has a nice elasticity (3 - 4 minutes or so)
  5. Coat a large bowl with olive oil, form the dough into a ball, and place it in the bowl, turning it to coat it thoroughly with the oil
  6. Cover with plastic wrap, and let rise until double in size
  7. Punch down the dough
  8. Coat a 9" x 13" baking pan with olive oil, and press out your dough into it, working it all the way into the corners the best you can
  9. Drizzle olive oil all over the top of the dough, spread it out, and poke dimples in the dough with your fingertips (it's fine if they fill in with olive oil)
  10. Sprinkle the rosemary on top of the bread
  11. Bake at 375F for 35 minutes
  12. Let cool on a wire rack or a stovetop burner
Notes:
  1. This bread makes great sandwiches, toasted or untoasted, if split in half horizontally.
  2. Although I simply used rosemary in this case, it's like pizza dough, and you can top it with practically anything you like.
  3. The basic dough itself, w/o the oilve oil and rosemary topping, makes good pizza dough.
  4. If you make this in a chilly winter house, you may want to use rapid-rise or instant yeast, instead of regular, just to speed up the rising process.

Sunday, January 18, 2009

Lemon Bars

Yield: 2 dozen
Cook Time and Temp: 45-50 minutes, at 350F

Ingredients:
  • 1 c. of all-purpose flour (self-rising works, as well)
  • 1/2 c. (1 stick) of butter, softened
  • 1/4 c. powdered sugar
  • 1 c. granulated sugar
  • 2 Tbs. of lemon juice
  • 2 tsp. grated lemon peel (optional)
  • 1/2 tsp. baking powder
  • 1/4 tsp. salt
  • 2 eggs
  • extra powdered sugar, for dusting the cooled cookies (about 2 Tbs.)
Method:
  1. Heat oven to 350F
  2. Mix together the first three ingredients, and press the dough into an ungreased 8" x 8" baking dish, working the edges up the sides about 1/2".
  3. Bake for 20 minutes
  4. Beat together the sugar, lemon juice, peel, baking powder, salt and eggs with an electric mixer for 2-3 minutes on high until fluffy, and the color gets a bit lighter yellow. Note: a whisk will work, but it takes forever.
  5. Pour the filling into the hot crust, and return it to the oven for another 25-30 minutes
  6. Let cool, and dust with the additional powdered sugar.
  7. Cut into bars
Note: the filling will form a very thin crust as it cools, which is normal, but gets hidden by the powdered sugar. The filling comes out smooth and soft, with a slightly sweet, crunchy bottom crust.

This recipe can be doubled, if using a 9" x 13" oven dish.

Thursday, January 15, 2009

Carrot Cake

Yield: One 13" x 9" pan, a double-layer round cake, or a boatload of muffins
Cook Time & Temp: 350F for around 40 - 45 minutes (muffins take less)

Ingredients:

  • 1.5 cups of sugar
  • 1 cup of oil (or two sticks of butter, but butter will make it dense, not light)
  • 3 eggs
  • 2 cups of flour
  • 1.5 tsp. ground cinnamon
  • 1 tsp. of baking doda
  • 1 tsp. of vanilla
  • 0.5 tsp of salt
  • 0.25 tsp. of ground nutmeg
  • 3 cups of shredded carrot
  • 1 cup of chopped walnuts
  • cream cheese frosting (optional)
Shredding the carrots is about the only thing I ever use the food processor for. It takes forever, if you use a box grater, but that'll work, too. Do not skimp on the butter/oil, because it'll be dry and inedible if you do. It sounds like a lot, but any less won't work well. I just eyeball the spices in the palm of my hand, but really do measure the oil, if I use it instead of butter.

As is usual, mix your wet and dry ingredients in separate bowls, then add the wet to the dry, stirring them together into a batter.

Dump out the stuff into a greased and floured pan. I suppose you could use cooking spray, but I've never tried that with carrot cake.

Let it bake at 350F for 40 minutes, then check on it. It might need a little longer. Use the toothpick or bamboo skewer test on it. If it's done, take it out, and let it cool.

Optional cream cheese icing:
  • an 8 oz. pack of cream cheese
  • half a stick of butter
  • 2 tsp. of milk
  • 1 tsp. of vanilla
  • 4 cups of powdered sugar
It's a lot of powdered sugar. This frosting recipe can be cut in half, if you don't want a thick gooey mess on your carrot cake. You can skip it altogether, if you want, although, if I'm going to eat junk, I want it with the works, so to speak.

Wednesday, January 14, 2009

Ginger Snaps

You know you want this. It's a ginger snap. Yes, it's a nice crunchy bit of goodness in your mouth that may bring back memories of childhood.

Yield: 4-5 dozen cookies, depending on how big you make them

Bake Time: 10-11 minutes per batch, at 375.

Ingredients:

  • 1 cup of brown sugar, packed (light or dark is irrelevant)
  • a stick and a half of butter (nuke it if you have to, or melt it on the stovetop)
  • 1/4 cup of molasses
  • 1 egg
  • 2-1/4 cups of flour
  • 2 tsp. of baking soda
  • 1 tsp. of ground cinnamon
  • 1 tsp. of ground ginger
  • 1/2 tsp. of ground cloves
  • big pinch of salt (maybe close to 1/4 tsp.)
  • extra granulated sugar, for the rolling thing
Mix the first four ingredients in one bowl, and the others in a different bowl. Pour your wet ingredients into the dry ones, and mix really well. This is going to make a really stiff dough. You might want to use a sturdy metal spoon for it. It's supposed to be this way.

Chill it in the fridge for maybe an hour, or the freezer for half an hour.

Preheat your oven to 375F, and when you are ready to bake these suckers, get out a spoon, ball up a scoop in your hands, roll the top half of it in that excess sugar, and just plop them onto your cookie sheet, sugar side up.

I lightly grease my cookie sheet with a little canola oil, because it's aluminum, but if you have a non-stick one, skip that.

Tip: between batches, stick the dough back in the fridge, because if it isn't cold, it'll get sticky, and won't roll into balls very well.